Showing posts with label DIY. Show all posts

Friday, March 13, 2015

How-to Shoot in Manual Mode: Part 2 How to Get a Blurry Background


Photography is all about manipulating light to artistically capture moments. There are 3 settings on your camera that are used to manipulate light. Shooting in manual means that you will control all 3 of these settings. These are...

1. Aperture
2. Shutter Speed
3. ISO

Each of these settings does something different. However, all of these settings effect how light or dark a picture is. I hope to teach you how to adjust your settings to get your picture to look a certain way, and how to balance the 3 settings so that your picture is correctly exposed.

Aperture

Aperture is my favorite photography setting. In my opinion, it changes moments in time into art. It helps to tell a story.

Aperture is the setting on your camera that selects how much of the picture is clear or "in focus". Aperture is measured in "f-stops". Depending on your lens your f-stops will measure between f1.2- f22.

The lower the f-stop (1.2) the blurrier the background will be, and the smaller the focused area will be. A lower number also means a brighter photo.

A higher f-stop (22) will make all of your picture clear and in focus. It will also be a darker photo.


When would I want to use a low f-stop?
I shoot using a low aperture like 1.4 or 2.8 as often as I can. I love the look of a dreamy blurred background. I can get away with this tiny focus area when photographing one person, or an object. I will sometimes bump it up to 3.5 to get more of an area in focus, or when taking pictures of more than 1 person.

When do I want to use a high f-stop?
If you want everything in focus like your kids, and the grass, and trees behind them, choose a high f-stop. This will capture the details in everything. I also use a higher f-stop when photographing groups. This way everyone's face is in focus.


Go try:
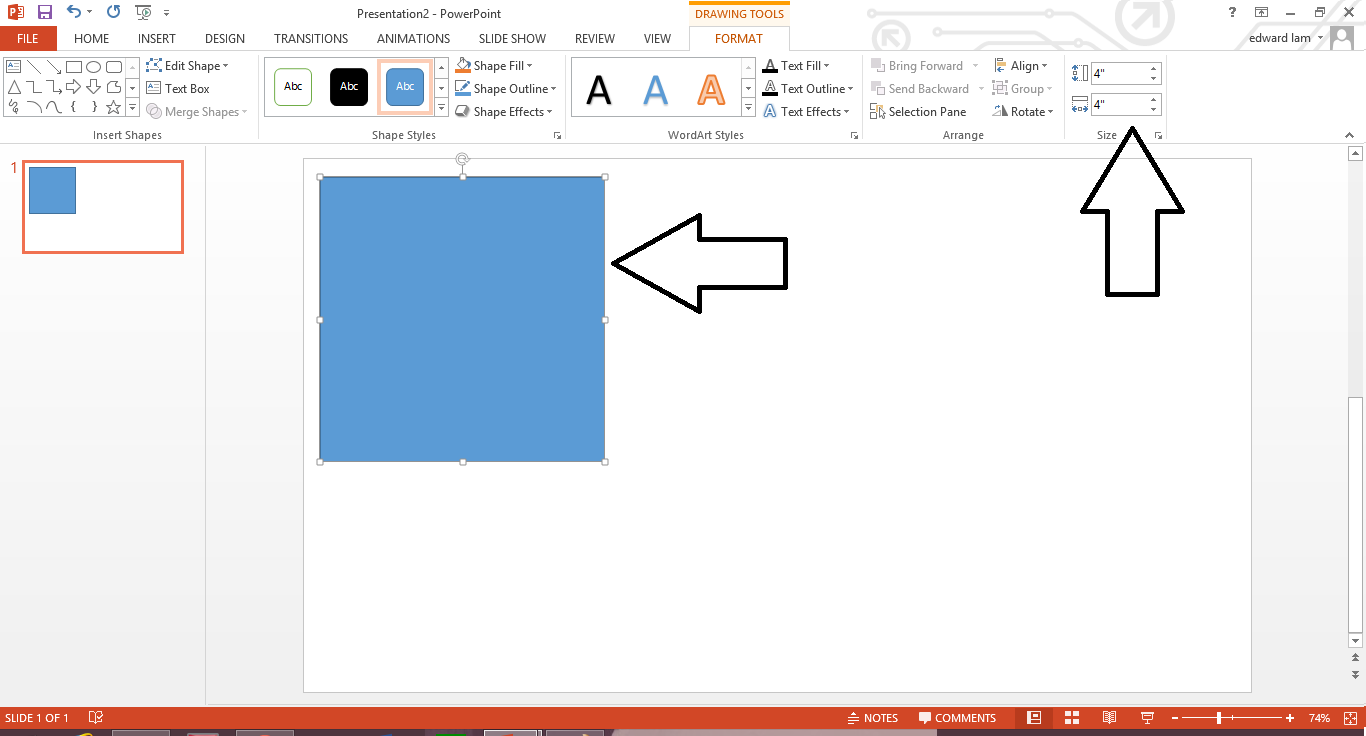
Shooting in Aperture Priority mode. There is usually a dial on the top of your camera that says "A".Using this setting, you select the aperture using your menu or a dial and the camera will take care of everything else.  Every camera is different so check your manual for how to adjust the aperture on your camera.  Try shooting an object using the lowest aperture that you have. If you only have the lens that comes with your camera it is probably 3.5 - 4.5. Aim your camera to focus on your object and take your picture.
Then try adjusting your camera to a higher aperture like f11 or f22 and shoot the same picture. Play around with it.

Wednesday, March 4, 2015

FREE Printable St. Patrick's Day Signs


Below is a link to 4 signs that would be perfect to frame and use as decor this St. Patrick's Day. There are 4 signs total. Click the link below to download them all for FREE. 

The "Lucky" sign will print as an 8x10, The "Happy St. Patrick's Day" sign will print as a 5x7, and two versions of the "Irish Blessing" will print as a 4x6. 

stpatricksdaysignsfreeprintables.pdf


Sunday, March 1, 2015

DIY St. Patrick's Day Sign

For the last four years I have invited my family over for St. Patrick's Day dinner. It is the one holiday that is always at my house. We cook corned beef and cabbage, everyone wears green,  and the kids work on crafts. Last year we even created a photo booth with hilarious props. 

To make this sign you will need:
  • canvas
  • vinyl letters
  • green paint
  • gold glitter
  • Mod podge
  • freezer paper
  • large & thin paint brush
  • pencil


Friday, February 20, 2015

DIY Personalized Beach Pails


Personalized Beach Pails How to
how to beach pail personalized
At a relatively cheap price, you can create these personalized pails. They make great end of the year gifts for students or favors for birthday parties. The personalization is an easy and quick way to kick them up a notch. 
Supplies
  • Pails : The one used below came from the 99 cents store for $1.49. There is no reason to spend more. A plastic pail is a plastic pail. 
  • Elmer's Painters: I purchased these on Ebay in assorted colors. All craft stores sell them. 
* Keep wet and dry paper towels around to clean up mistakes. If you make a mistake (like I did) you can wipe off the paint right away and start over. 
Personalized Beach Pails
How to write names on beach pail

I gave these out to my second graders right before summer vacation. On each pail, I wrote the 
student's name and drew a picture. My co-teacher and I also filled the pails with books, and candy. The kids were so excited.


Saturday, August 2, 2014

Back to School: DIY Personalized Pencil Case

September is just around the corner and back to school sales have already started. This is a tutorial for a personalized pencil case. There's not much to this really. Once you have your supplies- you draw. That's it.
 
Supplies:
  • A plastic pencil case. This one was from Staples.
  • Elmer's Painters paint markers in assorted colors.
*Keep wet and dry paper towels close by. If you make a mistake with the paint marker, it will easily wipe off while it's still wet.
 
 
Step 1: Use your paint markers to draw a design. I chose a character from Frozen. I recommend googling simple pictures of your idea as a guide. Once you choose your image - keep it close by for reference. This part will take you the longest. As seen in the picture, paint your lightest colors first and let dry before layering other colors on top. It takes a few minutes to dry completely.
Step 2: Write the name. This was tricky for me. The middle part of this pencil case had a glossy finish and some of my paint markers did not hold very well. I wiped them off, and tried another, eventually going with white.
Step 3: Decorate the rest of the box. I used super simple snowflakes. (intersecting lines)
Finished Product


Friday, July 25, 2014

DIY Cupcake Toppers: Part 2: Assembly


Hello! This is part two of the cupcake topper tutorial. Here I will show you how to assemble the toppers you created in Part 1.


Supplies
  • Your printed designs from Part 1
  • Circle paper punch 1 3/8"
  • Scallop paper punch 2"
  • Glue
  • Scissor
  • Toothpicks
  • Construction paper or scrapbooking paper.


Step 1: Cut out everything. Using the circle paper punch, punch out your designs upside down. This provides more control when centering. Then punch out the scalloped circles. You will need 2 of these for each topper, and punch out any decorations you might use. Here I used Martha Stewart's ribbon bow punch.


Step 2: Glue your design onto the scalloped circle.
Step 3: Add glue and glue on your toothpick. Then use another scalloped circle to seal it making sure the two scalloped punches line up exactly. This will seal in/hide the toothpick and make your cupcake topper look pretty from any point of view.


If you have any questions, please comment below.

Wednesday, July 23, 2014

DIY Cupcake Toppers: Part 1

This is a tutorial for how-to create cupcake toppers for a celebration. You will learn how to use your computer to create the correct size and shaped text to be used to tailor make cupcake toppers for any occasion. These can be used for any holiday or celebration because you create the text or images you want. 

Supplies:
Part 1:
  • Your computer & printer
  • Microsoft Word
  • White paper or cardstock.
Part 2 ( Coming Soon)
  • Circle paper punch 1 3/8'
  • Scallop paper punch 2'
  • Glue
  • Scissor
  • Toothpicks
  • Construction paper or scrapbooking paper.


 Step 1: Open Up a Microsoft Word Document. Click on Insert> Shape> and click on the oval shape. Then move to your screen and click and draw your shape. 


Step 2: Adjust the size to fit your paper punch. My circle punch was 1 3/8 so I changed the diameter of the circle to be 1.45. This way, I can guarentee that I won't see the outline, but the text will be visible after it is cut out.

Friday, July 18, 2014

DIY Wedding Date Banner & Our Engagement Shoot


We had a long engagement. We were saving and we were planning. During that time I somehow convinced my husband to take professional engagement pictures as part of my birthday present. Of course that meant figuring out what to wear, how to do my makeup and hair, and what props to bring. One idea I came across was a wedding date banner. These are usually used for Save the Date annoucements. They seemed simple enough and here is how I made the one seen in our picture above. 

Supplies:
  • White cardstock or coverstock. (Regular printer paper will not do, the numbers will flip over with the slightest wind.)
  • Your computer & printer
  • Optional- Heart paper punch ( I used one by Mary Uchida for the one above, and cut it out by hand in the pictures seen below.)
  • Red construction paper
  • Ribbon
  • Hole puncher. The one I used creates slits instead of circles and is by Fishkars
  • Tape
  • Glue
Part 1: Computer Time

Step 1: Open up a powerpoint document. Microsoft Word or any word processor will also work. I find it easier to move around text inside powerpoint. Click Insert>Text Box and choose the rectangle shape.

Step 2:Then click on your workshape and hold down the mouse to create a shape. Next adjust the size on the top right. You can make this any size you want. Here I did 4x4. 

Step 3: Unless you want a blue banner, change the color. Click on shape fill and adjust. Then shape outline and adjust. I like to make the shape outline a light/medium gray. This ensures that it is dark enough to see when I have to cut it out, but light enough that if I make a mistake or a little bit of the trim shows, it won't show up in photos. 


Step 4: Add your numbers. Click Insert>Text Box. Then click inside your square. Type in one number from your date. Adjust your font, color, and size. Here I used Imprint MT Shadow which came standard on the computer in size 250. 
Step 5: Use your mouse to click outside of your text and shape and draw it over all of your work. Hold onto the mouse button the whole time. When you're finished the shape will be hilighted. Now you're going to click copy, or Ctrl-C. Then click paste or Ctrl-P and move your duplicated work to a spot close by but not covering your work. I like to line up the shapes exactly. This makes cutting them out quicker. Repeat this step until you have enough squares for your entire date and the hearts. I needed 12. This required 3 additional pages (slides), as I only fit 3 on a page.


Step 6: Click in each box, erase the number, and write in the numbers you need. I leave 2 blank for the hearts. When I first tried to print the heart picture, the color of my printer just wasn't bright enough. You could paste a picture of a heart from the internet or use the shape tool you used the create the square to make the heart if you choose. 


Step 7: Print it out ON CARDSTOCK.

Part 2: Assembly

Step 1: Cut out all your numbers using the squares as your guide. 


Step 2: Using your hole puncher, punch 2 holes along the top of each number.


Step 3: Cut out and glue your hearts onto the paper or draw them. 

 Step 4: Thread your ribbon through the holes of each square. Make sure they are in the correct order!


Step 5: Center your numbers on the ribbon making sure there is enough extra on both ends for you to hold or suspend. Once everything is correctly positioned, use tape to hold down the ribbon on the back side of each square. This will help the numbers from sliding behind each other. 


Done.


Other pictures from our shoot. 

It started raining.


* The photos from our shoot were captured by the talented Adeline Ramos for George Street Photo*