Showing posts with label Wedding. Show all posts

Wednesday, July 23, 2014

DIY Cupcake Toppers: Part 1

This is a tutorial for how-to create cupcake toppers for a celebration. You will learn how to use your computer to create the correct size and shaped text to be used to tailor make cupcake toppers for any occasion. These can be used for any holiday or celebration because you create the text or images you want. 

Supplies:
Part 1:
  • Your computer & printer
  • Microsoft Word
  • White paper or cardstock.
Part 2 ( Coming Soon)
  • Circle paper punch 1 3/8'
  • Scallop paper punch 2'
  • Glue
  • Scissor
  • Toothpicks
  • Construction paper or scrapbooking paper.


 Step 1: Open Up a Microsoft Word Document. Click on Insert> Shape> and click on the oval shape. Then move to your screen and click and draw your shape. 


Step 2: Adjust the size to fit your paper punch. My circle punch was 1 3/8 so I changed the diameter of the circle to be 1.45. This way, I can guarentee that I won't see the outline, but the text will be visible after it is cut out.

Monday, July 21, 2014

Our Wedding Favors: Personalized Hot Cocoa & Mugs

(Photo by Adeline Ramos for George Street Photo)

 We ordered these for our guests. They come packaged as blank white packages with sheets of personalized label stickers. I did not know this when I ordered them, but it really didn't take much time to do. The stickers were also thick enough that if I made a mistake and put the label on in the wrong spot, I could peel it off and try again without ripping it. We ordered the whisks on the side and planned on giving out those two as favors.

That was until my mom came across the personalized mugs.

We ordered our mugs from this website. It was the only option I found that was affordable and I spent hours looking. When you place your order, they warn you that some may break during shipping. We ordered extra to be on the safe side, but every single mug arrived safe and sound.

I picked up some plastic gift bags and rolls of purple ribbon at the Dollar Tree and recruited help. We spent about 2 hours adding the stickers to the cocoa packets, filling each mug with the cocoa and whisk, and tying bows to each favor.


Questions? Comment.


Friday, July 18, 2014

Our Wedding Day Details

Our wedding day was the funnest day ever! It was so fun to have everyone we love from all the dimensions of our life, together in one space to share our joy. We got married in February and a snow storm had just passed in New York. There was snow on the ground and the threat of rain, but it all held out for our special day. 
The Ceremony

Our First Dance
Us having fun/Cake Cutting

My suave husband

Getting Ready

Our family & bridal party on the limo bus ( That broke down twice!) 

Our Centerpieces
Our Favors


Our Cake


 Bride & Groom chair signs using the Carolyna Pro Black font seen here:
 My 5 Favorite Fonts & Where to Find Them.


The Dress & Monogrammed hanger


My bouquet
I loved the charms that I made to include loved ones that had passed on. I purchased them from Perfect Pendants on Etsy and followed their simple directions. Everything was included except the photos and they only took about 5 minutes to make. I then dropped them off at the florist and they attached them for free. 


* All photos were taken by the super talented Adeline Ramos for George Street Photo* 

DIY Wedding Date Banner & Our Engagement Shoot


We had a long engagement. We were saving and we were planning. During that time I somehow convinced my husband to take professional engagement pictures as part of my birthday present. Of course that meant figuring out what to wear, how to do my makeup and hair, and what props to bring. One idea I came across was a wedding date banner. These are usually used for Save the Date annoucements. They seemed simple enough and here is how I made the one seen in our picture above. 

Supplies:
  • White cardstock or coverstock. (Regular printer paper will not do, the numbers will flip over with the slightest wind.)
  • Your computer & printer
  • Optional- Heart paper punch ( I used one by Mary Uchida for the one above, and cut it out by hand in the pictures seen below.)
  • Red construction paper
  • Ribbon
  • Hole puncher. The one I used creates slits instead of circles and is by Fishkars
  • Tape
  • Glue
Part 1: Computer Time

Step 1: Open up a powerpoint document. Microsoft Word or any word processor will also work. I find it easier to move around text inside powerpoint. Click Insert>Text Box and choose the rectangle shape.

Step 2:Then click on your workshape and hold down the mouse to create a shape. Next adjust the size on the top right. You can make this any size you want. Here I did 4x4. 
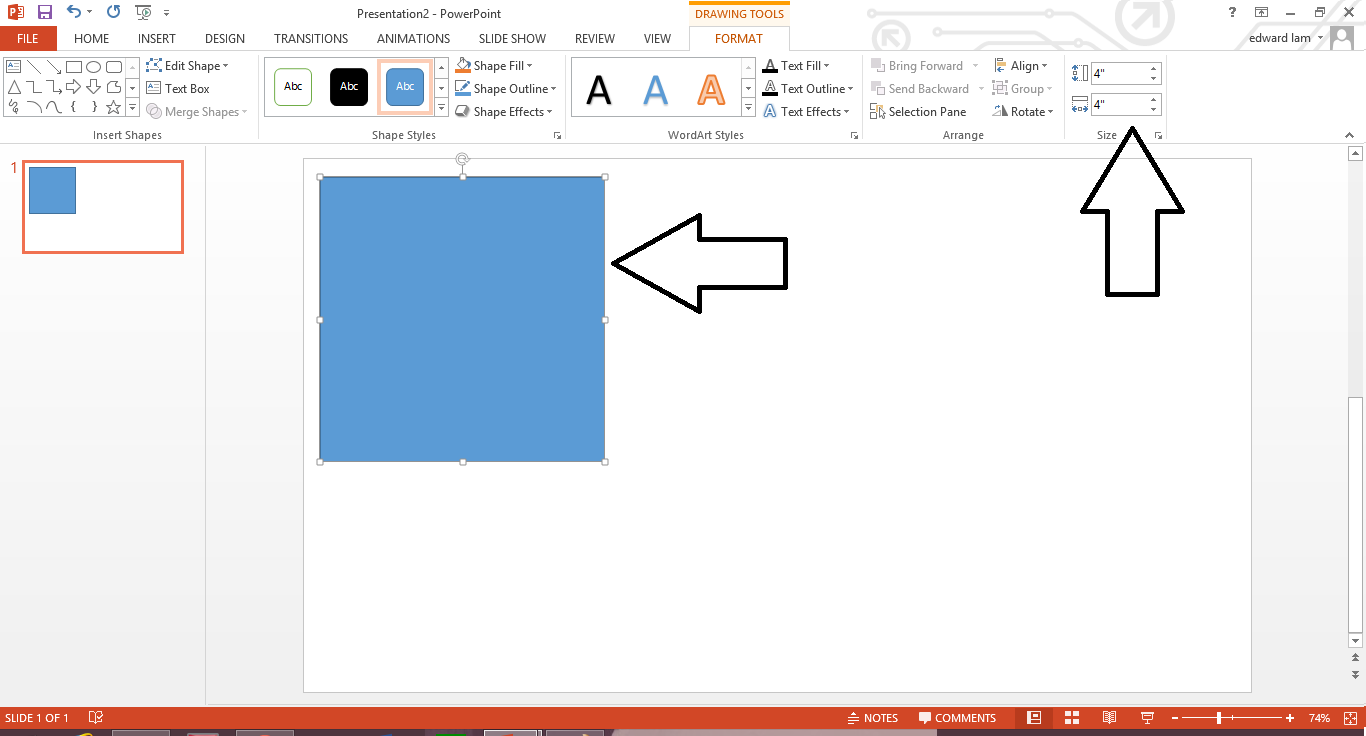
Step 3: Unless you want a blue banner, change the color. Click on shape fill and adjust. Then shape outline and adjust. I like to make the shape outline a light/medium gray. This ensures that it is dark enough to see when I have to cut it out, but light enough that if I make a mistake or a little bit of the trim shows, it won't show up in photos. 


Step 4: Add your numbers. Click Insert>Text Box. Then click inside your square. Type in one number from your date. Adjust your font, color, and size. Here I used Imprint MT Shadow which came standard on the computer in size 250. 
Step 5: Use your mouse to click outside of your text and shape and draw it over all of your work. Hold onto the mouse button the whole time. When you're finished the shape will be hilighted. Now you're going to click copy, or Ctrl-C. Then click paste or Ctrl-P and move your duplicated work to a spot close by but not covering your work. I like to line up the shapes exactly. This makes cutting them out quicker. Repeat this step until you have enough squares for your entire date and the hearts. I needed 12. This required 3 additional pages (slides), as I only fit 3 on a page.


Step 6: Click in each box, erase the number, and write in the numbers you need. I leave 2 blank for the hearts. When I first tried to print the heart picture, the color of my printer just wasn't bright enough. You could paste a picture of a heart from the internet or use the shape tool you used the create the square to make the heart if you choose. 


Step 7: Print it out ON CARDSTOCK.

Part 2: Assembly

Step 1: Cut out all your numbers using the squares as your guide. 


Step 2: Using your hole puncher, punch 2 holes along the top of each number.


Step 3: Cut out and glue your hearts onto the paper or draw them. 

 Step 4: Thread your ribbon through the holes of each square. Make sure they are in the correct order!


Step 5: Center your numbers on the ribbon making sure there is enough extra on both ends for you to hold or suspend. Once everything is correctly positioned, use tape to hold down the ribbon on the back side of each square. This will help the numbers from sliding behind each other. 


Done.


Other pictures from our shoot. 

It started raining.


* The photos from our shoot were captured by the talented Adeline Ramos for George Street Photo* 


Tuesday, July 15, 2014

DIY Personalized Bridesmaids Gifts: Monogrammed (Part 1)


Before I got married, I looked all over Pinterest for ideas for gifts for our bridal party. I saw some great ideas and plenty of ideas that just weren't us. It was hard and the ideas I liked didn't exactly fit into our wedding budget. I decided to take these on myself. 

I had 4 bridesmaids, 2 junior bridesmaids, and a flower girl. I also made one for my mom, my mother in law, and myself  =).

Supplies:
  • Your computer and printer
  • Font Download : Vine Monogram by Font Brothers. Please note that this license is for personal use only and can not be used to create and sell products. 
Step 1: Open up a Powerpoint Document.This will probably work in Microsoft Word, or any word processing tool. I just prefer Powerpoint because you have the flexibility of moving the text around the page. Then open up a text box by clicking Insert> text box> and then clicking on your page to open the text box.  


Step 2: Type in your monogram using the font Vine Monograms. 
* Tip * When you use this font youre going to use lowercase letters to type the first and middle initial ( the edges) and caps to type the middle initial. Here, I typed the initials in that order in standard font, and then changed it to the monogram font. 


Step 3: Adjust the font size. I found that size 80 fit nicely on these hangers. Experiment. Eyeball it and then cut it out and hold it on your hanger. 


 When you're done- print it out. Make sure you print it on regular printer paper. You will be "carving" through the paper- so thick paper will just make it harder on you. You can reuse old paper with writing on it if that is all that is available. 


Part 2: Transferring your Design onto the Hanger
Click here to see what comes next!


Questions? Comment.